Day 11 - Exploring .NET Core with Visual Studio 2017 and the updated CLI Tools
Disclaimer: I am not on the .NET Core Team. I used the tools available publicly and have no insights into the future of .NET Core. It looks very bright though. :)
Intro
A complete list of post in this series is included below :
- Day 1 - Installing and Running .NET Core on a Windows Box
- Day 2 - Taking a Look at the Visual Studio Templates for .NET Core
- Day 3 - Running a .NET Core app on a Mac
- Day 4 - Creating a NuGet Package from .NET Core app
- Day 5 - Creating a Test Project from .NET Core
- Day 6 - Migrating an existing .NET Core to csproj
- Day 7 - Creating an ASP.NET Core Web Application
- Day 8 - Using Visual Studio Code with a .NET Core Console Application
- Day 9 - Creating a .NET Core Console App inside of Visual Studio Code
- Day 10 - Using JetBrains Rider with a .NET Core Console Application
In this post, we’re going to look at Visual Studio 2017 and the updated CLI tools and what that means for .NET Core.
Visual Studio 2017 Loves .NET Core
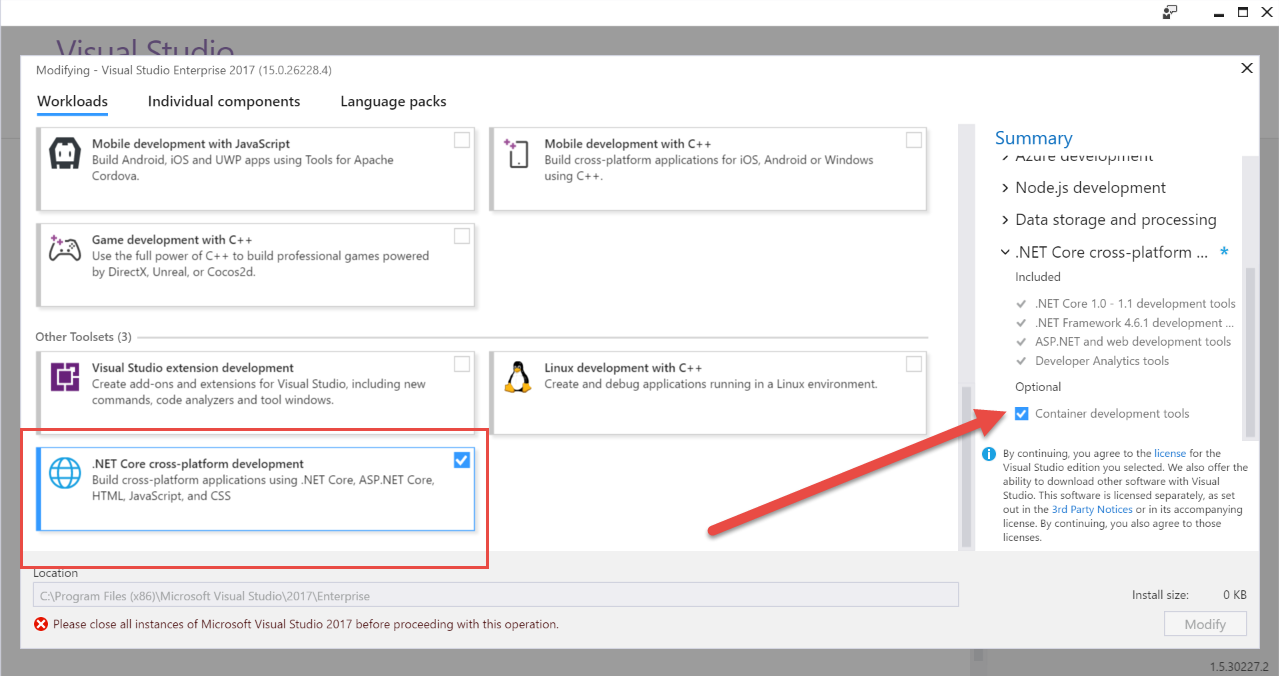
If you haven’t downloaded Visual Studio 2017 yet, then you should grab it! After downloading it, make sure the .NET Core cross-platform development box is checked. You will find it under “Other Toolsets” as shown below. You’ll also want to make sure the Container development tools is checked.

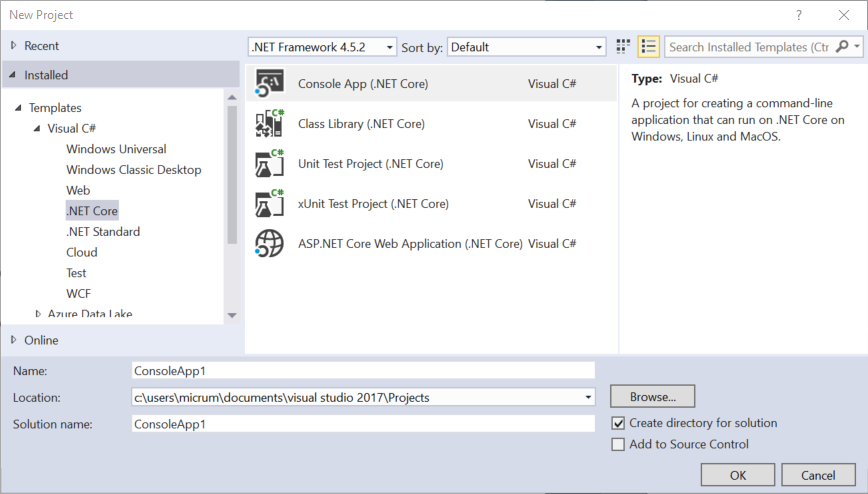
Once it is installed, you can open Visual Studio 2017 and goto File->New Project and select .NET Core as shown below to enjoy the new templates.

You may notice that now you will see the Unit Test and xUnit Test Project Templates. You may notice a few other differences once you have loaded your project, but they are minor.
Where is the project.json?
If you’ve read my previous post then you would know that I talked about project.json going away and the move towards MSBuild. Well the time has come that it is now gone. Don’t worry you can still quickly modify your Target Framework, etc. You should probably begin by taking a look at the project properties. You will notice that the Target Framework has .NETCoreApp1.0 and 1.1 to select from.

You can also open the .csproj proj directly within Visual Studio 2017. As you can see, it only contains a few lines for the Console application.
<Project Sdk="Microsoft.NET.Sdk">

  <PropertyGroup>
    <OutputType>Exe</OutputType>
    <TargetFramework>netcoreapp1.1</TargetFramework>
  </PropertyGroup>

</Project>
Tip: If you also have a project created with an older version of .NET Core, then go ahead and open it inside of Visual Studio 2017 and it will prompt you to upgrade.
Updates to the CLI Tools
Open the command prompt after installing Visual Studio 2017 and run dotnet --info and you will see the following :
.NET Command Line Tools (1.0.0)

Product Information:
 Version:            1.0.0
 Commit SHA-1 hash:  e53429feb4

Runtime Environment:
 OS Name:     Windows
 OS Version:  10.0.14393
 OS Platform: Windows
 RID:         win10-x64
 Base Path:   C:\Program Files\dotnet\sdk\1.0.0
That is right! We are now at 1.0.
.NET Core Target Framework from the Command Line
We can now run dotnet new console -f netcoreapp1.0 command to specify a .NET Core Console app that uses the 1.0 Framework. We can also use dotnet new console -f netcoreapp1.1 for a .NET Core 1.1 app.
Create a Solution File from the Command Line
Simply type dotnet new sln and you can create a Solution file for those instances where you have multiple projects. You can think of this as a replacement to your project.json files.
Chain commands together
For example you can create a new MVC app with no authentication and specify the framework with the following command :
dotnet new mvc --auth None --framework netcoreapp1.1
Wrap-up
It looks like .NET Core is getting better and better! As always, thanks for reading and smash one of those share buttons to give this post some love if you found it helpful. Also, feel free to leave a comment below or follow me on twitter for daily links and tips.

Leave a Comment