Azure Tips and Tricks Part 99 - Creating an Email Subscription with Azure Functions - Writing the Frontend
Azure Developer Guide Book 2nd Edition available now! This free eBook is available now at aka.ms/azuredevebook.
Intro
Most folks aren’t aware of how powerful the Azure platform really is. As I’ve been presenting topics on Azure, I’ve had many people say, “How did you do that?” So I’ll be documenting my tips and tricks for Azure in these posts.
The Complete List of Azure Tips and Tricks
Where are we?
Full Source Code The source code for the app can be found on GitHub
This blog post is part of a series on how to generate a weekly digest email for a blog using Azure Functions, SendGrid and Azure Storage.
- Part 1 - What we’re going to build and how to build it
- Part 2 - Storing Emails using Azure Table Storage
- Part 3 - Writing the Frontend with HTML5 and jQuery
- Part 4 - Sending Emails with Sendgrid and Azure Functions
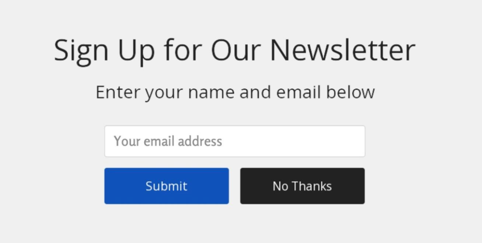
We’re trying to build a Email Subscription similar to the following. If you want to catch up, then read the previous posts.

Writing the frontend
In our last post, we left off by creating an Azure Function that had the ability to accept a POST request and store data using Azure Table Storage for our email address. While this works great in something like Postman, we need to create a way to allow a user to interact with it.
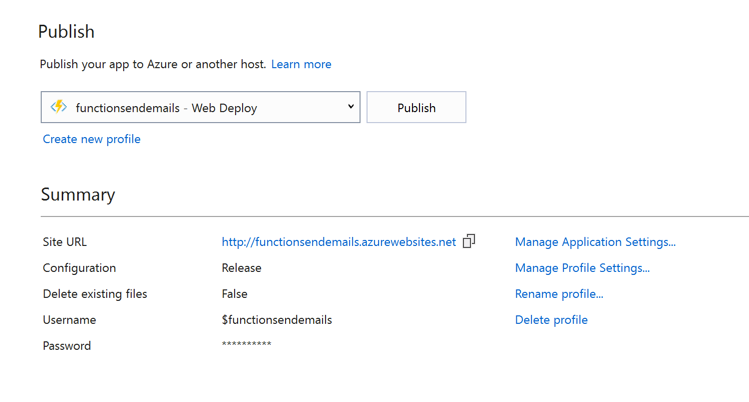
Now is a great time to go ahead and publish our Azure Function. Simply right click the project name and select Publish, then Publish again as shown below.

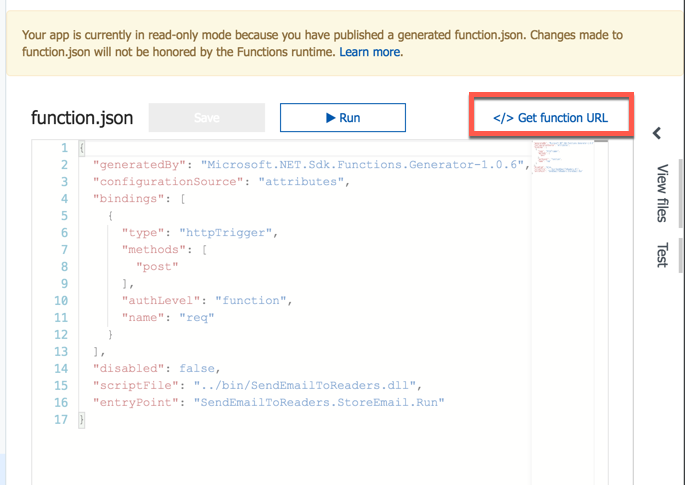
Once it deploys, if you click on the StoreEmail function, then you’ll see a Get Function URL as shown below.

If you click it, then copy and paste the Function url as you’ll use that later.

Dealing with CORS
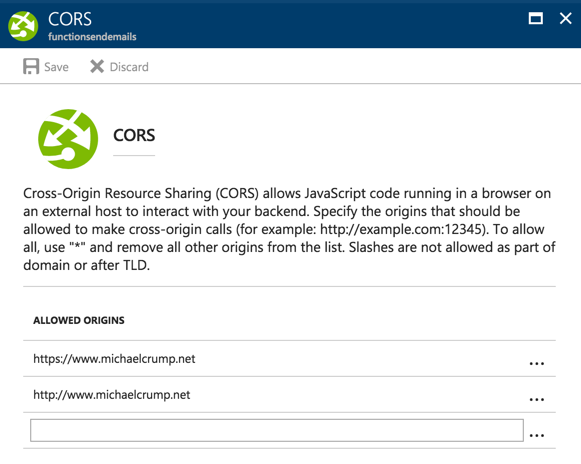
While we’re in the portal, click on your Azure Function and under Platform Features, you’ll see API and then CORS.
Cross-Origin Resource Sharing (CORS) allows JavaScript code running in a browser on an external host to interact with your backend.
Since we’ll be moving this to a web host shorly, you’ll want to specify your domain name. Here is mine:

Finally, the frontend.
Create a new .HTML page anywhere and begin by adding the following code:
<div class="style-1">
    <h1>Subscribe to Michael's Weekly Blog Digest</h1>
    <i>I'll send you an email once a week of all my recent blog posts and notable Azure news.</i>
    </div>
    <form id="target">
    <ul class="form-style-1">
        <div id="contactForm">
        Email: <span class="required">*</span>
        <li><input type="text" name="fromEmail" /></li>
        <li><br/>
            <input type="submit" value="Send!" /></li>
        </div>
    </ul>
    </form>
<div id="contactFormStatus" class="style-1">
This gives us a form along with an input type for our email address and a submit button. We also have a div tag at the bottom which we’ll use to show status of the request.
Now we’ll use jQuery and a Ajax call to POST the email address to our Azure Function url that we copied earlier. We will be using a regex that I stole off the web for additional verification they are supplying a valid email address.
 <script src="https://code.jquery.com/jquery-3.1.1.min.js"></script>
 <script type="text/javascript">
      var url = "https://functionsendemails.azurewebsites.net/api/StoreEmail?code=hKngrr6sq35GJ8cb6al4K6oP0cRphKNDMXpLrCtoNCJzM0ZDwJNkJQ==";
     $("form").on('submit', function (event) {
         event.preventDefault();
         var data = $(this).serialize();

         $("#target :input").prop("disabled", true);
         var reg = /^((([a-z]|\d|[!#\$%&'\*\+\-\/=\?\^_`{\|}~]|[\u00A0-\uD7FF\uF900-\uFDCF\uFDF0-\uFFEF])+(\.([a-z]|\d|[!#\$%&'\*\+\-\/=\?\^_`{\|}~]|[\u00A0-\uD7FF\uF900-\uFDCF\uFDF0-\uFFEF])+)*)|((\x22)((((\x20|\x09)*(\x0d\x0a))?(\x20|\x09)+)?(([\x01-\x08\x0b\x0c\x0e-\x1f\x7f]|\x21|[\x23-\x5b]|[\x5d-\x7e]|[\u00A0-\uD7FF\uF900-\uFDCF\uFDF0-\uFFEF])|(\\([\x01-\x09\x0b\x0c\x0d-\x7f]|[\u00A0-\uD7FF\uF900-\uFDCF\uFDF0-\uFFEF]))))*(((\x20|\x09)*(\x0d\x0a))?(\x20|\x09)+)?(\x22)))@((([a-z]|\d|[\u00A0-\uD7FF\uF900-\uFDCF\uFDF0-\uFFEF])|(([a-z]|\d|[\u00A0-\uD7FF\uF900-\uFDCF\uFDF0-\uFFEF])([a-z]|\d|-|\.|_|~|[\u00A0-\uD7FF\uF900-\uFDCF\uFDF0-\uFFEF])*([a-z]|\d|[\u00A0-\uD7FF\uF900-\uFDCF\uFDF0-\uFFEF])))\.)+(([a-z]|[\u00A0-\uD7FF\uF900-\uFDCF\uFDF0-\uFFEF])|(([a-z]|[\u00A0-\uD7FF\uF900-\uFDCF\uFDF0-\uFFEF])([a-z]|\d|-|\.|_|~|[\u00A0-\uD7FF\uF900-\uFDCF\uFDF0-\uFFEF])*([a-z]|[\u00A0-\uD7FF\uF900-\uFDCF\uFDF0-\uFFEF])))\.?$/i
         var address = $('input:text').val();
            if(reg.test(address) == false) {
                // Validation Failed
                $("#contactFormStatus").html("Enter a valid email address").css({ 'color': 'red', 'font-size': '110%' });;
                $("#target :input").prop("disabled", false);
            }
            else {
            $.ajax({
                type: "POST",
                url: url,
                data: data,
                dataType: "text",
                headers: {'Content-Type': 'application/x-www-form-urlencoded'},
                success: function (respData) {
                    $("#contactFormStatus").html(respData).css({ 'color': 'green', 'font-size': '100%' });;
                    $("#target :input").prop("disabled", true);
                },
                error: function (jqXHR) {
                    $("#contactFormStatus").html("An error occurred: " + jqXHR.responseText).css({ 'color': 'red', 'font-size': '110%' });;
                    $("#target :input").prop("disabled", false);
                }
            });
            }
     });
 </script>
We’ll now put in some CSS to make the site look prettier.
<style type="text/css">
.style-1 {
  margin: 10px auto;
  max-width: 400px;
  padding: 20px 12px 10px 20px;
  font: 13px "Lucida Sans Unicode", "Lucida Grande", sans-serif;
}

.form-style-1 {
  margin: 10px auto;
  max-width: 400px;
  padding: 20px 12px 10px 20px;
  font: 13px "Lucida Sans Unicode", "Lucida Grande", sans-serif;
}

.form-style-1 li {
  padding: 0;
  display: block;
  list-style: none;
  margin: 10px 0 0 0;
}

.form-style-1 label {
  margin: 0 0 3px 0;
  padding: 0px;
  display: block;
  font-weight: bold;
}

.form-style-1 input[type=text],
.form-style-1 input[type=date],
.form-style-1 input[type=datetime],
.form-style-1 input[type=number],
.form-style-1 input[type=search],
.form-style-1 input[type=time],
.form-style-1 input[type=url],
.form-style-1 input[type=email],
textarea,
select {
  box-sizing: border-box;
  -webkit-box-sizing: border-box;
  -moz-box-sizing: border-box;
  border: 1px solid #BEBEBE;
  padding: 7px;
  margin: 0px;
  -webkit-transition: all 0.30s ease-in-out;
  -moz-transition: all 0.30s ease-in-out;
  -ms-transition: all 0.30s ease-in-out;
  -o-transition: all 0.30s ease-in-out;
  outline: none;
}

.form-style-1 input[type=text]:focus,
.form-style-1 input[type=date]:focus,
.form-style-1 input[type=datetime]:focus,
.form-style-1 input[type=number]:focus,
.form-style-1 input[type=search]:focus,
.form-style-1 input[type=time]:focus,
.form-style-1 input[type=url]:focus,
.form-style-1 input[type=email]:focus,
.form-style-1 textarea:focus,
.form-style-1 select:focus {
  -moz-box-shadow: 0 0 8px #88D5E9;
  -webkit-box-shadow: 0 0 8px #88D5E9;
  box-shadow: 0 0 8px #88D5E9;
  border: 1px solid #88D5E9;
}

.form-style-1 .field-divided {
  width: 49%;
}

.form-style-1 .field-long {
  width: 100%;
}

.form-style-1 .field-select {
  width: 100%;
}

.form-style-1 .field-textarea {
  height: 100px;
}

.form-style-1 input[type=submit],
.form-style-1 input[type=button] {
  background: #4B99AD;
  padding: 8px 15px 8px 15px;
  border: none;
  color: #fff;
}

.form-style-1 input[type=submit]:hover,
.form-style-1 input[type=button]:hover {
  background: #4691A4;
  box-shadow: none;
  -moz-box-shadow: none;
  -webkit-box-shadow: none;
}

.form-style-1 .required {
  color: red;
}


</style>
If you try to run the code on your server then you’ll see it works as designed. You can also use something like Azure Storage Explorer to see the data in the table.

Come back next week and we’ll wire up the Email functionality with Sendgrid. Happy Coding!
Want more Azure Tips and Tricks?
If you’d like to learn more Azure Tips and Tricks, then follow me on twitter or stay tuned to this blog! I’d also love to hear your tips and tricks for working in Azure, just leave a comment below.

Leave a Comment