
Azure Tips and Tricks Part 124 - Creating the Azure Logic App for our IoT Button
Check out Azure.Source : A very nice mix of Azure news, announcements, videos, podcast and more. Read weekly
Intro
Most folks aren’t aware of how powerful the Azure platform really is. As I’ve been presenting topics on Azure, I’ve had many people say, “How did you do that?” So I’ll be documenting my tips and tricks for Azure in these posts.
The Complete List of Azure Tips and Tricks
The Series so Far
At Build 2018, we first saw the IoT Button. I started exploring the device with the very first unboxing and decided to create a mini-series to walk you how to use the device from start to finish. The series (so far) is located below
- Creating an IoT for the IoT Button
- Configuring and Setting up the IoT Button
- Creating the Azure Logic App for our IoT Button
- Using Azure Function to call our Logic App with the IoT Button
Creating the Azure Logic App for our IoT Button
Now that we know how to setup an IoT Hub and configure out device to get on the network and use said IoT Hub, now we need to actually get to what we are going to build:
An app that automatically add a row to an excel sheet that includes a time along with a status (such as start or stop).
Add an Azure Logic App and provide the details for Name, Description, Resource Group and more and click Add.

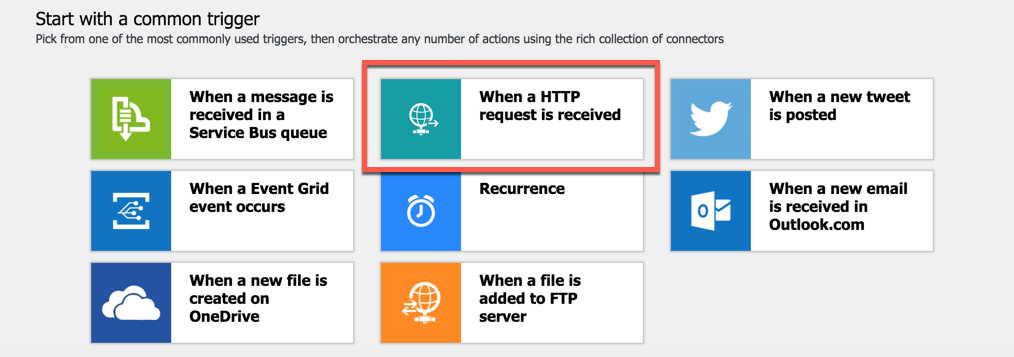
Click on When a HTTP request is received, to use as our template
Since we’re going to pass a field into this Logic App that writes if the status is Started or Stop in the excel sheet. This means that we need to add a field into the Request Body JSON Schema as shown below:
{
    "properties": {
        "status": {
            "type": "string"
        }
    },
    "type": "object"
}
We’ll also want to make sure that this is a POST method.
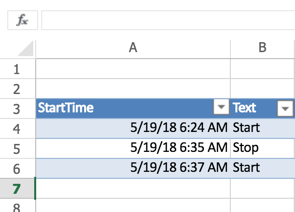
Before we proceed to add an action, we need to open a tab and login to OneDrive to create an Excel book and a table we can use in the next connector. I created one in the following location in my OneDrive /Excel/Book1.xlsx. Go ahead and create some data as shown below, with at least a StartTime and a Text in your OneDrive account.
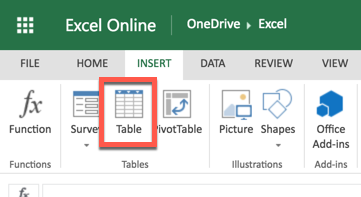
You’ll also need to create a table inside of it. Just open the Excel file add some data and then click the Table button.
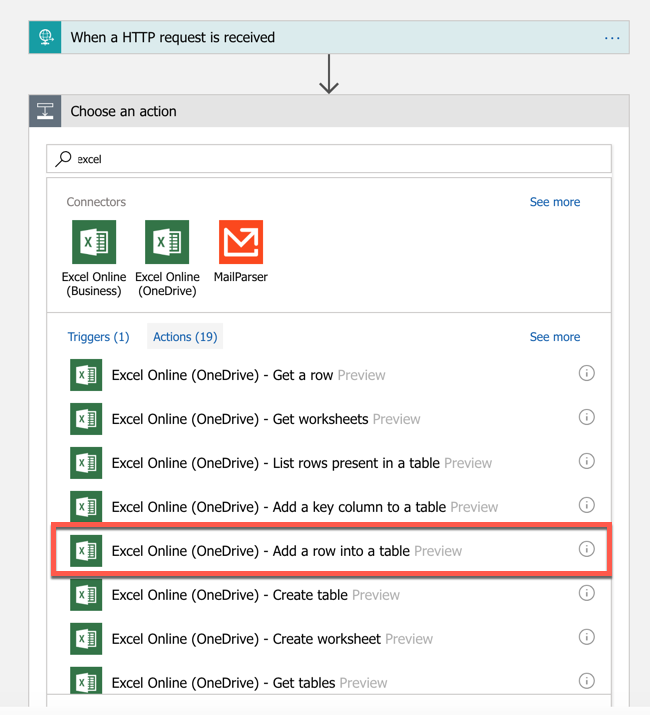
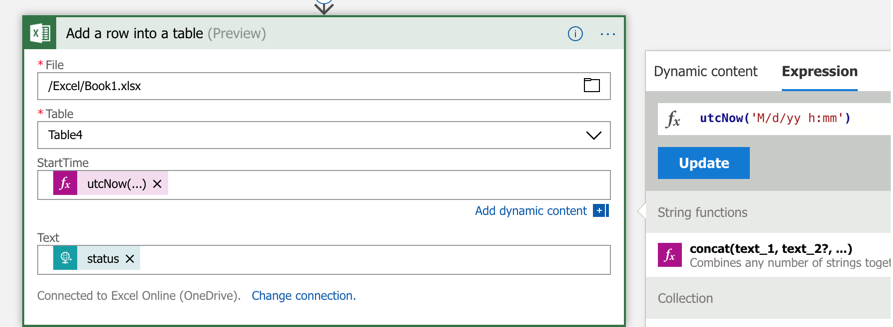
Now we’ll add an action and use the Add a row into a table (OneDrive) connector.
And we’ll provide our File, Table as indicated above.
For the StartTime, we’ll want to use an Expression with the code utcNow('M/d/yyyy h:mm'). This will give us a nicely formatted Date that we can easily work with.
For the Text, just use the Dynamic content called status that we are passing in.
Click Save at the top and our Azure Logic App is complete. We’ll need to write an Azure Function to call it tomorrow.
Want more Azure Tips and Tricks?
If you’d like to learn more Azure Tips and Tricks, then follow me on twitter or stay tuned to this blog! I’d also love to hear your tips and tricks for working in Azure, just leave a comment below.
Leave a Comment