
Enable the Azure CLI with BASH in Windows 10
Intro
One thing that most folks aren’t aware of is that they can enabled the Azure CLI within Windows using BASH. You’ll need BASH installed before going forward, so add it from the “Add/Remove Features” and select Windows Subsystem for Linux. Let’s jump right in.
Azure CLI tooling with a couple of commands
Open the BASH prompt in Windows 10 and run the following command:
echo "deb [arch=amd64] https://packages.microsoft.com/repos/azure-cli/ wheezy main" | sudo tee /etc/apt/sources.list.d/azure-cli.list
It’ll ask for your sudo password and then modify your sources list. You’ll see the following output from BASH:
deb [arch=amd64] https://packages.microsoft.com/repos/azure-cli/ wheezy main
Enter the following three commands:
sudo apt-key adv --keyserver packages.microsoft.com --recv-keys 417A0893
sudo apt-get install apt-transport-https
sudo apt-get update && sudo apt-get install azure-cli
The first command is apt-key which apt-key is used to manage the list of keys used by apt to authenticate packages. Packages which have been authenticated using these keys will be considered trusted.
The second command installs the apt-transport-https which allows sources accessible over https (Hypertext Transfer Protocol Secure).
The third command updates packages and installs the Azure 2.0 CLI from the packages repo we entered in the beginning.
Get Started with Azure CLI Commands
Now you can begin running Azure commands. I’d start with running:
az
You will see the following screen:
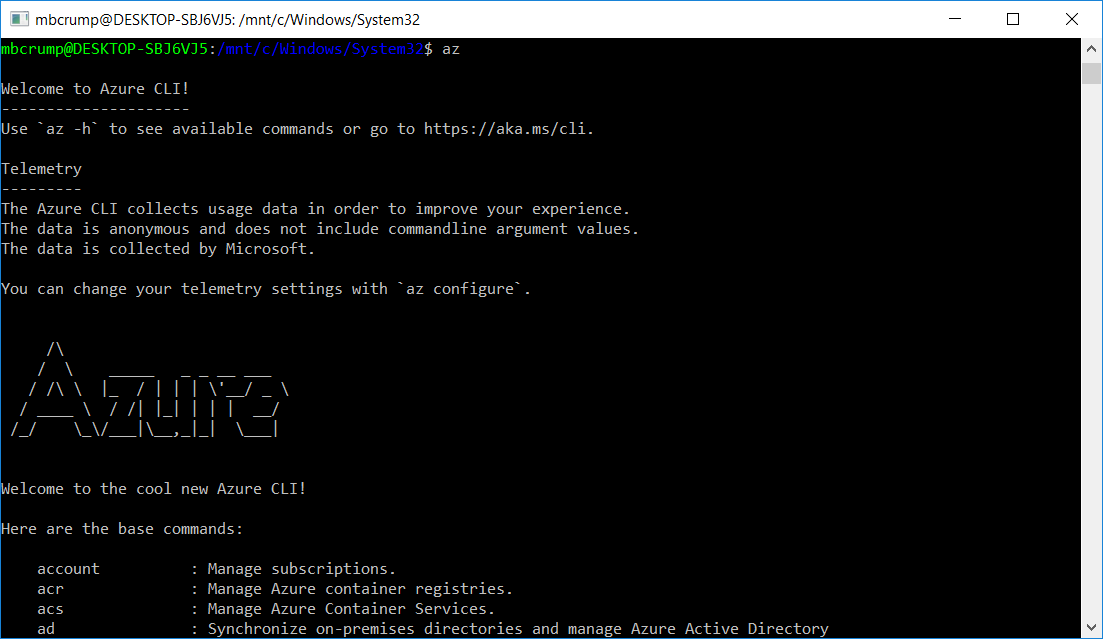
Wow, that was pretty easy! We can see from the screen-shot that we can type az -h or go to aka.ms/cli to get help documentation.
Type ‘az –version’ to get back version information of packages such as the CLI. You can also see what version of Python is running:
mbcrump@DESKTOP-SBJ6VJ5:/mnt/c/Windows/System32$ az --version
azure-cli (2.0.6)
...
...
Python (Linux) 3.6.1 (default, May 18 2017, 14:59:59)
[GCC 4.8.4]
Sign into your Azure Account
Type az login and you will see the following:
To sign in, use a web browser to open the page https://aka.ms/devicelogin and enter the code XXXX to authenticate.
Open your web browser and go to the page and you will see the following:
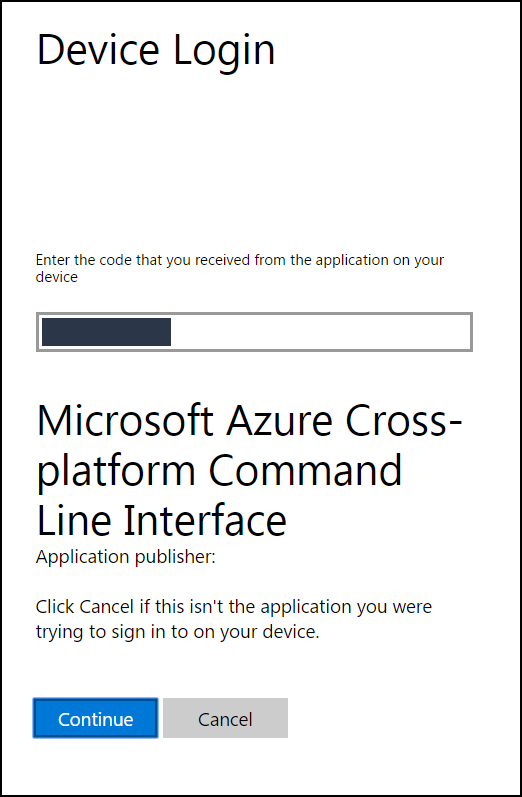
Enter you code that you got from BASH and press continue. It will ask to verify your login and then switch back to BASH and you will see the following if you logged in successfully:
[
  {
    "cloudName": "AzureCloud",
    "id": "xxx",
    "isDefault": true,
    "name": "Visual Studio Enterprise",
    "state": "Enabled",
    "tenantId": "xxx",
    "user": {
      "name": "micrum@mydomain.com",
      "type": "user"
    }
  },
  {
    "cloudName": "AzureCloud",
    "id": "xxx,
    "isDefault": false,
    "name": "Windows Azure Internal Consumption",
    "state": "Enabled",
    "tenantId": "xxx",
    "user": {
      "name": "micrum@mydomain.com",
      "type": "user"
    }
  }
]
Keep in mind that you can always get back to this screen with az account list. Now that you are logged in you can do all kinds of things such as create a Ubuntu VM with az vm create --resource-group myResourceGroup --name myVM --image UbuntuLTS --generate-ssh-keys. Very cool!
Don’t stop here, check out the docs and learn how to do more!
Wrap-up
As always, thanks for reading and smash one of those share buttons to give this post some love if you found it helpful. Also, feel free to leave a comment below or follow me on twitter for daily links and tips.
Leave a Comment